Then I attempted to add social buttons to my blog. You know, those clickable tabs so that I could remove all that junk on my right sidebar.
[Insert long siiiiiiggggghhhhhhhhh here.]
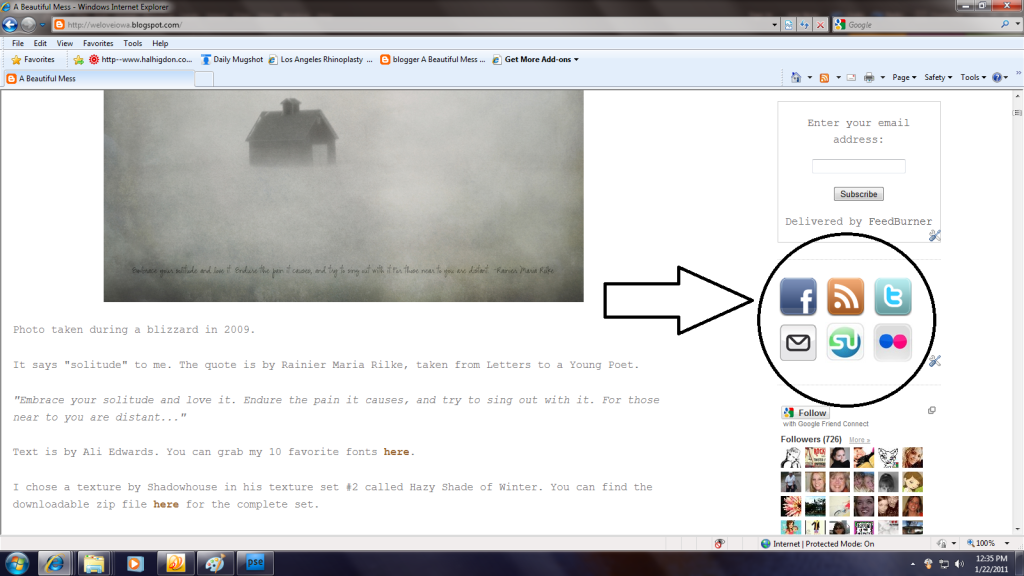
I just wanted it to look like this. Seems easy enough. Right?
I would have screamed or pulled my hair out but I didn't have it in me at 2 AM after several straight hours of staring at the computer monitor. I was toast. My brain was fried.
Why oh why won't they just work?
No, turns out I don't exactly fit into the "dummies" category by the world's standards. Trust me. Those tutorials went right over my head. So, by process of elimination there is only one category left- the category of idiots. Please. Just tell me I'm not alone in my technological retardation. Come on, just humor me a little.
So, after many, many painful, arduous hours slumped over my keyboard I have decided to share the little bit I know in an attempt to prevent you from an unnecessary computer induced cataract coma. You can thank me later.
Step 1. DOWNLOAD A PICTURE OF YOUR ICONS.
If you don't need anything fancy this is a great starting place. But there are literally hundreds of sites out there with endless amounts of images. If you get them from different sites, you may need to resize them to get them to all be the same size. I made mine 64x64 pixels in photoshop. (But the great thing about doing them this way vs blogger's generic widget is that you can customize them to any size or design of your liking.) Once you have them the size you like, save changes and then upload them to a third party hosting site, such as photobucket or flickr.
And if that seems like a pain, I have already saved several to my photobucket page and you are welcome to snag them to remove some of the leg work.
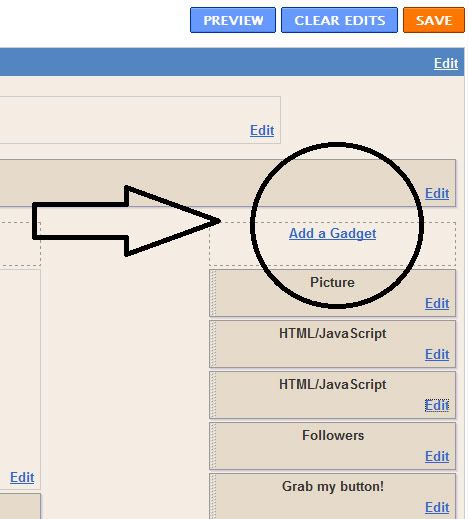
Step 2. ADD A GADGET
Sign in your blog and then go to design. From there click on add gadget.
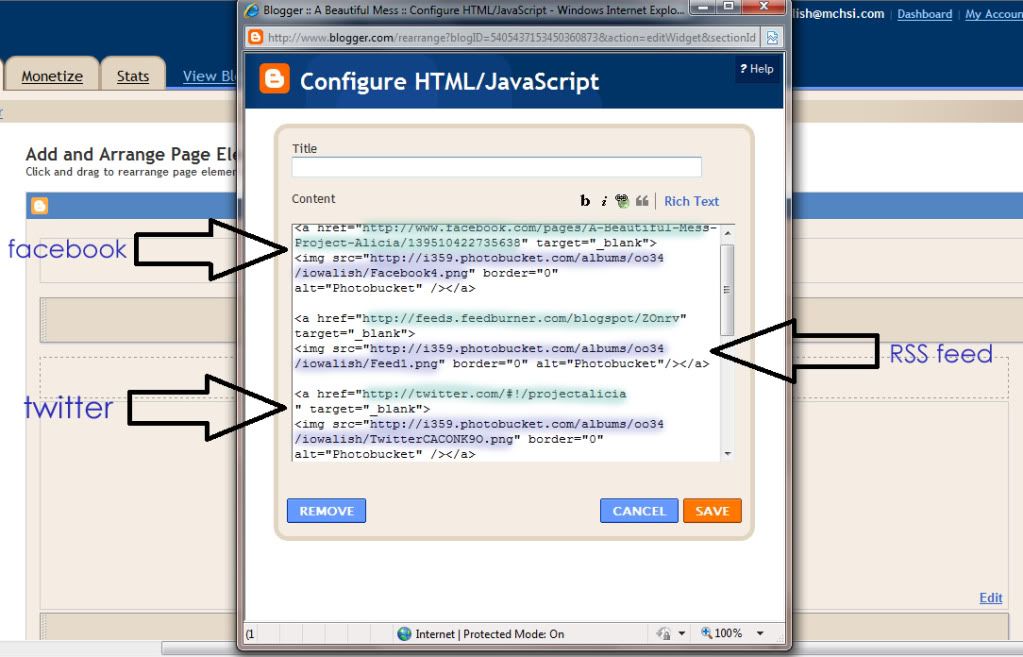
Step 3. INSERT CODE TO HTML/JAVASCRIPT
This is the important part.
Here is the code that you will use for each and every button.
Here is an example from my HTML/JavaScript menu for the first three buttons on my right sidebar. The light blue is my feed url. The darker blue is the photo url from photobucket.
I found that if I didn't include any positions in the coding the buttons automatically positioned themselves just fine, at least this seems to be the case with my template.
Save your work. And like magic- POOF! It only took me 2 days to figure this out.
Now let's shift gears.
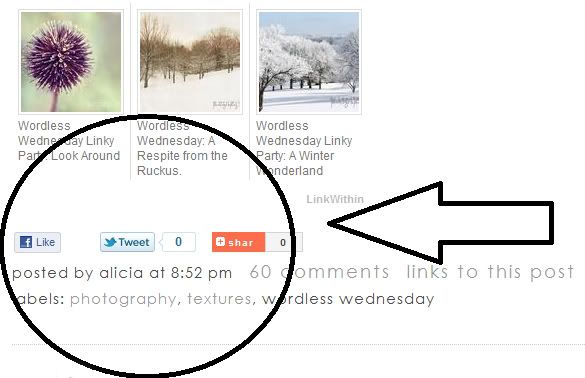
Clickable social buttons at the bottom of your posts.
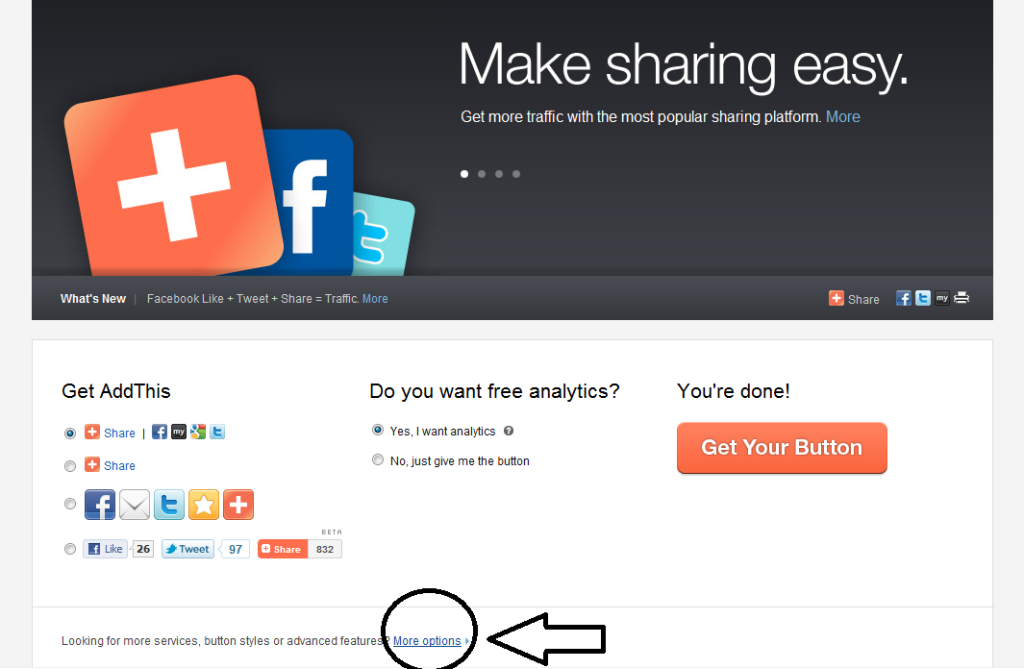
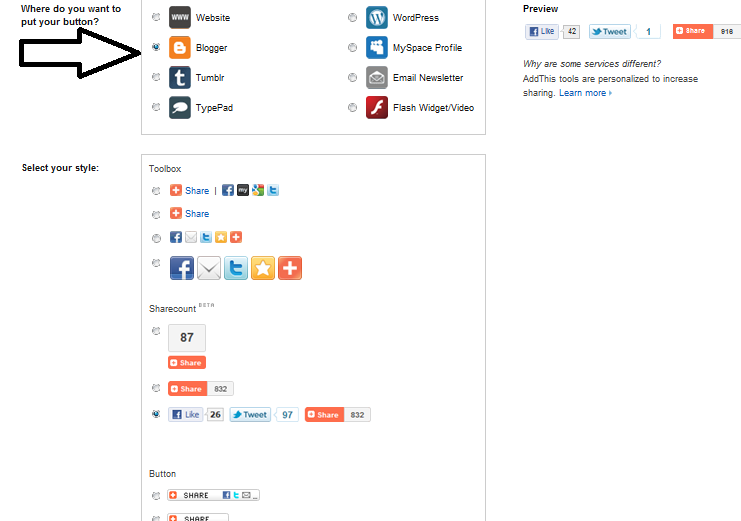
I found a really easy way to do this for blogger.
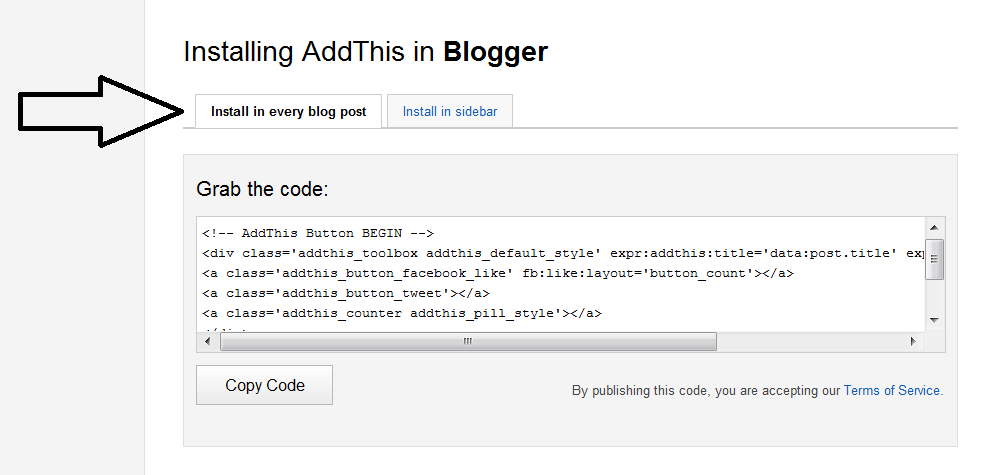
On the next page you will need to make sure that "install in every blog post" is selected. Then copy the code.
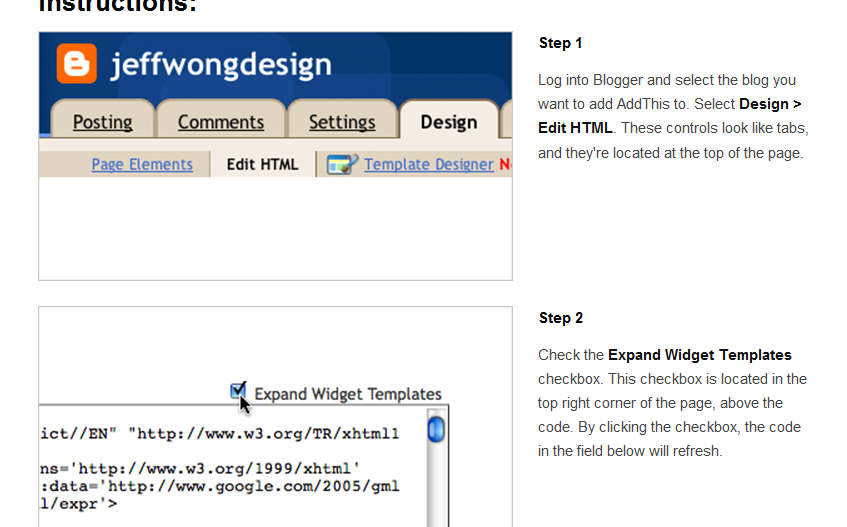
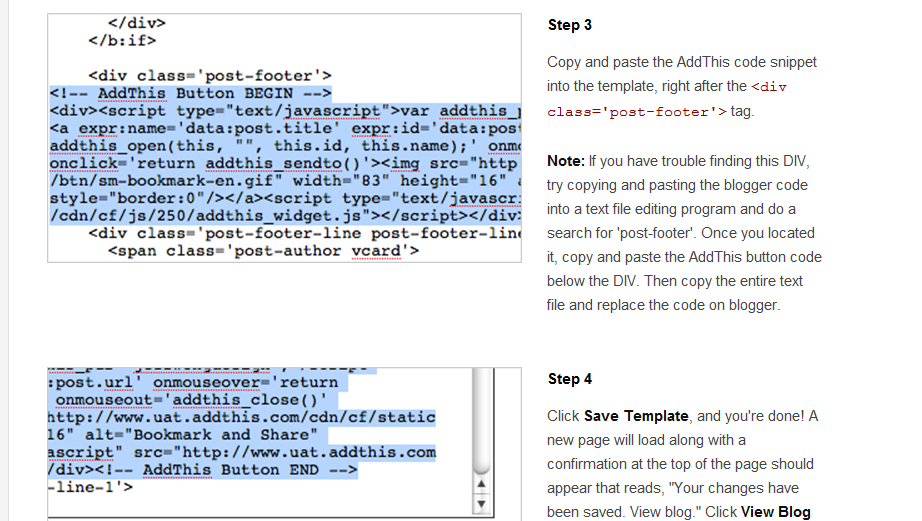
Below the code will be instructions for where to plug it into your blog. They are very precise, detailed instructions with visuals.
Follow their instructions word for word. It is a fabulous tutorial. You literally just copy and paste the code right into your edit HTML page exactly where they instruct you to (beneath the div class="post-footer" tag).
And voila. You are now movin up in the blogger world. Social media buttons. Check.
Now if someone could please tell me why they load so incredibly slow I would be most appreciative.




Wow, thanks for taking the time and sharing these great tips!!! I ´ll try to add the buttons to my blog, too.
ReplyDeleteHave a wonderful sunday!
Hello creator of amazing tutorials! I have some news....Congratulations are in order! I’ve awarded you with a “Stylish Blogger Award!” If you chose to accept please visit my post: http://liliannagrace.blogspot.com/2011/01/blogging-share-fun-love.html Grab the “Stylish Blogger” photo, and follow the rules. Thanks for being such a fantastic blogger!
ReplyDeletePart 1 I totally know, Part 2, not so much! I've wanted to add the tweet thing on my blog, but the green one. This one may do for now, though. :)
ReplyDeleteOMGoodness!
ReplyDeleteHow does anyone EVER understand all of that!
You go GIRL!
I admire you for attempting to understand it all!
xoxoxo
Wow, thank you so much for this tutorial!
ReplyDeleteYou are awesome! I've never even bothered because... well, it's too darn hard. Thanks for bringing it to my level.
ReplyDeleteOh, my gosh, you did a perfect job of explaining it, and the pictures you took of each step.
ReplyDeleteYou, ma'am, are NO dummy.
Thank you!!
ReplyDeleteHave I told you lately how much I really love you?! I had the buttons on the sidebar, but couldn't figure out how to add the little do-dads to the bottom of each post! Thank you so much for showing me how to do that!
ReplyDeleteI like your term technological retardation even though retard is so un PC. lol I'm that way too but I'm the only one that can get my TV to go from the Video mode to the TV mode. Ok it helps that our TV is really old (since 2000 is old?). For a minute we thought we would have to get a new TV to work the wii. I just explained that it's the same as switching from using the DVD/VHS player to the TV/Cable mode. I was happy when remote controls were created. Ok I'm that old. lol
ReplyDeleteAnyways, thanks for the tutorial. I did the links for facebook, etc the long way on my blog but I'll ck out I can make it easier.
This is so detailed and easy to follow! Thanks Lish!
ReplyDeleteThanks so much! I added new buttons to my blog and got rid of all those cluttering boxes!
ReplyDeletewww.texastypeamom.com
Thanks for sharing... though i have my set of share buttons, now i can design some custom icons and do more with them :)
ReplyDeleteYou're the best, truly. Thank you for taking the time to make someone else's attempt at this a little easier!
ReplyDeleteLish this is a big deal! So much work, and you are awesome to share! I may have to spend some time with this post. There is so much I need to do to my little old Blogger blog. Just no time!
ReplyDeleteI love your header, btw...is that a new quote?
Look at you being all techie! Go Alicia!
ReplyDeleteHaha! Look at you with your fancy schmancy social media buttons! I'm so proud of you for getting it all figured out on your own. You should be too! :)
ReplyDeleteThanks for the tutorial! I just added the cutest set.
ReplyDeletehow BRILLIANT are you???? Jeez, this is awesome!
ReplyDeleteSOOOOO COOL!!!!!!!!!!!!! awesome tutorial. totally added them to my blog.
ReplyDeletethank you thank you thank you for all of this VERY helpful info!!! Just used this little tutorial to spruce up my blog!
ReplyDeleteThanks a million!
ReplyDeleteThis was so so so so helpful. I had almost given up! Thank you so much : )
ReplyDeleteThat you SO much for this tutorial! I've been trying to figure out how to do this for a LONG time. THANK YOU! It works perfectly =]
ReplyDelete-Marissa
Just like you I had been searching for a way to do this. Thank you so much!!!
ReplyDeletehttp://kellycolsonphotography.blogspot.com/
I just added social media icons to my site with the help of your great tutorial. Don't know what i would have done without your help. I found these cute coffee cups and they are super cute. A huge thanks for your help with this!!!!
ReplyDeleteThank you thank you!!! I had been looking and looking myself and had given up hope!! I had added each of those icons as a separate pic w/a url because I couldn't find how to do this!! thanks again!!!
ReplyDeletewww.lara-lalaland.blogspot.com
www.teaandink.blogspot.com
Thank you so much for this blog post! You really have helped me a lot - been trying to get all these buttons done on my blog but I kept messing things up! Now it's done, THANKS TO YOU!! You are AWE... wait for it... SOME!!
ReplyDeleteTHANK YOU!!! I was about to spend 2 days on this. I swore it couldn't be that hard. But I couldn't find any SIMPLE instructions . . . until YOU! Perfect - easy, straightforward, simple.
ReplyDeleteNow, when I want to actually design/paint my own buttons, I'll know what to do to link them up!
(I think you were on BF a while back with a long thread about getting visitors ? - was that you? If so, you ROCK, Girl!)
I found your tutorial after two days of trying this myself.... all I can say is THANK YOU!! I finally got my icons to work!! :)
ReplyDeleteThank YOU!!! I was about to go crazy...until I discovered your website!
ReplyDeleteThank you so much for sharing this and making it so easy!
ReplyDeletethanks so much for posting this. whenever i install the links via your directions and click on an icon to see if it works it tries to find the page in my blog and says it cannot be found in my blog (instead of redirecting the page to an outside page like twitter or facebook). help :(
ReplyDeletethanks!
xo jillian
Thank you so much! :)
ReplyDeleteHurrah!!!! I won't confess how many late nights found me wondering why this must be so easy that no one has written a tutorial on how to do it. Thank you thank you!
ReplyDeleteGirl do you realize that I have been looking for weeks on how to add customized buttons to my blogs, and with your tutorial it took me about 2 minutes once I had everything set up. THANK YOU!!!
ReplyDeleteMaria @ A Platter of Figs
Once upon a time I, too tried to add social media buttons to my home page on my blog... and I, too sat in front of my pc for HOURS & could NOT figure out how to do it. You made it SO simple here... and I was able to do it, easily. THANK YOU for this post.
ReplyDeleteBless you!!! :) I had been trying to do this for hours as well. Your tutorial is by far the easiest to follow! And thanks for the access to your buttons.
ReplyDeleteIt has taken me MONTHS to find a tutorial to follow, easily! THANK YOU.
ReplyDeleteYou are a goddess!! I've spent the last 2 days doing exactly what you did - beating my head against my computer screen. You unraveled the mystery in one, simple post. Bless you.
ReplyDeleteI did a search for how to add these under my blog posts....this was by far the easiest method! Thank You!
ReplyDeleteYou are such a love. Thank you for helping me out! I looked at MANY tutorials and yours was by far the easiest to understand. I'm making a new blog (www.goingaustin.blogspot.com) and this was EXTREMELY helpful!! THANK YOU!
ReplyDeleteTHANK YOU, THANK YOU, THANK YOU! I have spent so long looking for the answer to this question. So helpful!
ReplyDeleteLOL thanks a lot =D
ReplyDeleteThank you so much for taking the time to figure out the social media buttons! You seriously made it so easy and now my blog is rockin'! You're awesome!
ReplyDeleteThank you so much!!!
ReplyDeleteThank you so much for creating this tutorial!! I have been trying to figure this out for forever. That was way easier than what I was doing :)
ReplyDeleteHi Alicia! Thank you for posting this. It was a huge help in getting the buttons up on my site. I was wondering if you have a pinterest button in the similar fashion as the other buttons you keep in flickr. For example, take a look at by blog and you can see where a pinterest button would fit perfect next to my twitter, rss, and facebook buttons. Let me know if you can help. Thanks again, and happy holidays!!
ReplyDeletewww.servingseconds.com
Thanks so much for sharing this!!! I needed this:-) Thanks and have a fab 2012!!
ReplyDeleteThank you for sharing this in such a digestible format - job very well done. It was extremely helpful!
ReplyDeleteJust stumbled on your site, just what I was looking for! I'll work on this tonight (hopefully NOT until 2:00am).
ReplyDeletewww.callias-corner.com
Thank you! Your steps were very helpful!
ReplyDeleteWell, I must be an idiot, because I have been trying forever to figure out how to get these buttons on my blog, but your directions were simple.
ReplyDeleteI'm an idiot too! Thanks so much for your invaluable help!
ReplyDeleteHi!
ReplyDeleteYou are amazing!!!! Thanks so much for this great post! I like you did all the same things! spent ages looking how to do this..... you have made my day, thank you!
Many many many thanks, kelli ;-)
kellilash.blogspot.com
You saved my day!!!
ReplyDeleteThank you Alicia! This was SO helpful! I now have buttons on my blog. Thank you for enduring the hair pulling experience, and then sharing it with us in an easy to follow, understandable format. YOU ROCK!
ReplyDeleteYou are awesome! Yes, YOU!
ReplyDeleteI followed your directions AND IT WORKED! Thank you, thank you, thank you.
Bonus: html not so scary after all
Thank you so much!!! This was INCREDIBLY helpful. I used it at www.hautewhimsy.com :)
ReplyDeleteThank you! This really worked for my blog :)
ReplyDeletei must be seriously dull, i just cannot get it to work :(
ReplyDelete