For starters, I really struggled with the prompt this week. It's a little too cool for pools just yet, even here in the south. No blue flowers popping up that I know of. I haven't spied any Robin's eggs just lying around. And wouldn't ya know? The rain decided to stop just when I wanted a little splashing (not that the sunshine is a bad thing- just to be clear). So, I put on my creative thinking cap and decided on a fun prop last minute. But then my family made it apparent I had no idea what turquoise was. So, I did what I do best. I consulted google. Apparently I've mistaken it for aqua and/or teal for 40 years. Who knew?
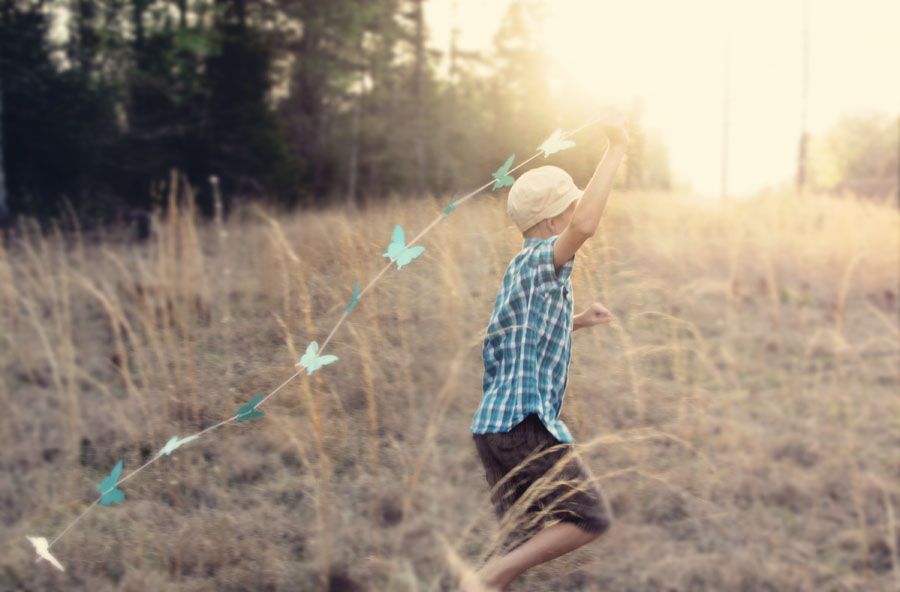 Slide mouse over image to see before & after effect (see tutorial below).
After I was squared away on the precise hue of turquoise, I set out to make a butterfly streamer for this week's prompt. Unfortunately I had a late start to my project (because
But sometimes our visions are just simply unrealistic. There- I said it.
No toddlers were readily available and of course it would have to be a day with no wind. Neither one of my kids wanted anything to do with this shoot, but I was pretty confident this was not ideal for selfies and hubs running with butterflies

We drove the 25 miles to a field that I had remembered from a Sunday drive a couple weeks ago only to learn upon our arrival that the yellow weeds had all been cut back. Panic set in as we raced the sun. We circled back and found a field of tall grass. Well, if you can call it a field. They're pretty non-existent in these parts what with all these pines that just so happen to be dropping yellow pollen bombs by the second and making my life pretty miserable as we speak. But I digress. It looked lovely from the road but upon closer inspection we learned that it was laden with thistles and thorns. To my surprise, Little Man was actually still willing. (This is when a toddler may have been the wrong choice.) We made our way past the worst of the spikey, barbed brush and he managed to find a small piece that was more manageable to walk through. Only with no wind, walking wouldn't suffice for the butterflies. He had to run. He made several loops back and forth. The light was perfect but waning. I took a quick glance at my camera's view finder and my stomach churned. The settings I had assumed were perfect weren't. And being in a rush, I hadn't set the camera to RAW or remembered my tripod. And the white balance was all wrong. The light was changing and fast and I

I just kept shooting. And hoping. Something had to work. It was about that time that the owner of our new found "field" decided to see what the crazy folks running around his property were up to. Unlike many others from previous shoots, he didn't seem in a hurry to alert the authorities. Although, by the look on his face, I could see that he was perplexed as to what we would be taking photos of in his weed infested terrain. Note to self: Ask permission first next time. As friendly as the folks of South Carolina seem to be, they sure get testy when I pull out my big camera. Luckily we were wrapping things up anyways and we didn't waste any time
We made another quick stop at a nearby orchard but the sun was already done for the day, at least for photos. It was a long, dark drive home and I couldn't help but wonder if this had been
Faux Tilt-Shift Tutorial
For the first, second and fourth photos in the series I actually tried a new technique using gaussian blur and layer masks for a softer, more whimsical feel. It's a fun way to get that tilt-shift look without the costly lens and without having to alter your current lens you are using. You can see the before and after in the 1st photo above. If you are interested in learning more, just follow the steps below in Photoshop or PSE.
1. Open your desired photo in Photoshop and edit to your liking. Make sure to save a copy before proceeding.
2. Flatten the image (Shortcut PC- CTRL Shift E) and then copy it above the original (Shortcut PC- CTRL J). For Mac users, use the command key first.
3. Add gaussian blur. While your copied photo is selected, go to filter > blur > gaussian blur. Leave the radius at about 9-10 pixels.
4. Add a layer mask to the blurred version. (In PS and PSE 9 and above- it is a little rectangle box with a white circle in the middle found at the bottom of your layer's palette. You will not find this in older versions.)
5. Adjust your sliding opacity scale (top of screen) to remove as little or as much unwanted portions in the layer that you desire (sort of like erasing it out without the eraser).
6. Set your foreground color to black, select a brush and paint out the blur in your Layer Mask over your subject (ie. Little Man).
7. Lower your opacity and brush size to remove blur on smaller sections (ie. the butterflies). You can make this as subtle or extreme as you'd like depending on the amount of blur you start with (in step 3) and the amount you remove in each section of your photo. (I left mine a bit more subtle for a softer effect.)
8. Save your new edit as a PSD file. This way if you decide you'd like to tweak it more later you can pick up where you left off. Save it as a JPG, resize and you have a lovely edit ready to share.
Note: For the 2nd photo I left Little Man more out of focus intentionally. If you have not yet used layer masks and this is confusing, let me know and I'd be happy to do a short step by step tutorial later with print screens. This allows for so much creative freedom while editing and it really is so simple! The effect may not be for you, but it is certainly a technique worth learning. The layer masks also work well for textures with your photos, particularly for portraits.

As for the butterfly streamers, they couldn't be easier! Such a simple craft that would be fun to do with your kids! If you haven't yet had Spring Break, tuck this away for a rainy day. Most of the materials needed are things you should already have on hand.

Butterfly Streamer Directions
1. Download a butterfly pattern. The internet is chock-full! If you don't believe me, just do a search. I used this butterfly pattern from Pastiche Family Portal. You could choose different patterns or varied sizes and mix them up for a fun look.
2. Copy and Paste Butterflies in Editing Program. I added six to an 8.5 x 11 sheet. With permission from the owner of the site I am offering this sheet of butterflies to you. So, if you like the template I used, you can grab the download here.
3. Print Butterfly Sheets. I printed two sheets to make a dozen. You can print onto solid or patterned card stock. And if you don't have card stock on hand, try just regular printer paper! Butterflies come in all colors and sizes. Get creative. (You could even get out the markers or crayons and have craft time with the littles.) And FYI: Once I got to my location to shoot, I actually cut two of my 12 butterflies off. 10 seemed perfect for us. You may opt for less if you have a smaller child.
4. Cut out butterflies. You will need small, sharp scissors to make this step easier. This is the most time consuming step. Find some helpers.
5. Punch two holes in each butterfly with a small punch. Ideally you will want holes to be in the top and bottom of the thorax area. I used a 1/8 inch punch.
6. String butterflies. Find some thin string of some kind. I happened to find some in our junk drawer that hubs had purchased for a different project. It reminded me of kite string. You will want to place the string in the top and bottom hole of each butterfly. I chose to string mine on the outlined side so that it wasn't on the front. You can space it out to your liking but I found that having it several inches apart made the butterflies look better in the photos. There is no right or wrong and they don't all need to be identical.
7. Tie knots under butterflies. To ensure that your butterflies stay in place you will want to tie a small knot under each butterfly.
8. Enjoy! Hang these in your kid's playroom, take them out on a windy day for some fun, or use them as a photo prop! Photos of your kids with a butterfly streamer would be lovely on a canvas!

Such a simple craft with all kinds of potential! My favorite kind of project!

If you've made it this far, you may be thinking this photo shoot was not successful, but I assure you- I learned plenty from this experience. And I hope that you can extract something from some of my mistakes as well. These photos may not have come easy or been exactly like my initial vision, but they will surely be treasured in the coming years (because I know that Little Man will have a growth spurt and possibly even hit puberty one of these days, ha). Plus I now have a fun prop that can hopefully be used in subsequent shoots as well (hopefully with younger subjects).
I also know that it is only from trial and error that we grow and become better photographers. These photo challenges are not always easy, but they force us to think outside of the box and try things that we may not have otherwise considered. They also shed light on our areas of weakness. I now have a burning desire to study Kelvin and shutter speed more. I would also love a couple new lenses, but I will never tire of the rush that comes from creating something beautiful on a budget. There are many that may not agree with me, but I truly believe that 3/4 of photography is your own personal vision and drive put to action. The camera is but an extension of the person behind the lens.


For questions or comments feel free to email me at callmelish@gmail.com. Or follow me on facebook so you don't miss out on any of the happenings here at Project Alicia.

I’m teaming up with Rebecca of Bumbles & Light and Kristi of Live and Love out Loud for another inspiring adventure as we photograph our way through spring with the Nurture Photography Challenge - a seasonal photo challenge series chock full of tips and tutorials, inspiring weekly prompts, personal feedback and encouragement.
Just a few details:
All are welcome regardless of skill level, camera equipment or geographic location.
Share your favorite images inspired by our weekly prompts each Friday and grab our lovely button while you’re at it!

The linky will remain open from 9am Friday – 9am Thursday CST. Don’t forget to visit and comment on the previous entry in the linky list.
We’re sharing the photography love and showcasing our talented photographers by pinning some of your lovely photos to our Nurture Photography Inspiration Board.
The Nurture Photography Challenge has taken to Facebook! Stop by, “like” our new Facebook fan page, ask questions and share your work on our wall as well.
We love Instagram just as much as you do! We’ll be on the lookout for your beautiful winter photos, so be sure to use the #nurturephoto hashtag. We’ll share a few favorites on Instagram each week, sending a little bit of love your way.
Great turquoise! I'm a sucker for anything butterflies...and you added the lovely 'how to'. Love it and your images are fun!
ReplyDeleteBeautiful - I love butterflies <3
ReplyDeleteThanks Diane! I think I'm in a butterfly obsessed phase... so stay tuned. You may see more butterfly projects in the near future. ;)
ReplyDeleteAbsolutely lovely!!!
ReplyDeleteOops...I added the wrong URL when I linked up...can you change it for me? sorry. it should be :http://www.butterfliesintimephotography.blogspot.com/ Thanks!
ReplyDeleteI'll forward this to Kristi since she does the linky. Thanks for letting me know! ;)
ReplyDeleteSuch a cute butterfly streamer tutorial! My girls might love making this.
ReplyDeleteI enjoyed reading your story ... Your son seems to be having great fun with the butterflies! Your pictures are so dreamy and beautiful, thank yoy for the tutorial to create a fault - tilt - shift, I look forward of following it!
ReplyDeletefirst off, i thoroughly enjoyed your candidness this week! it's so good to hear that I'm not always alone when it comes to forgetting to check my settings before I begin! second ... the butterfly streamer tutorial is already pinned. i'd love to have this on hand for future sessions. third, i can't wait to try the faux tilt-shift tutorial - pinning that next. :) and lastly, i knew you'd have a fabulous post, because you always manage to pull something clever and creative together!! oh ... and that bit about little man locking himself in his room and only doing the shoot for money had me laughing out loud. i can so relate! haha
ReplyDeleteI am just now getting to making my rounds. Goodness, I agree with you on so many levels. I could write a book in response to what you have written and experienced. The kids, lighting, parking and pulling away fast... Great job in the end and yes, these challenges help me try to see things differently and push myself! I agree that a lot of great photography is the person behind the lens! Hugs
ReplyDeleteGreat post Alicia. I think we all often have similar struggles when it comes to photography!
ReplyDeleteoh you have me cracking up b/c this is so my life - good intentions and I'm always late to the parties! {next time sew the butterflies - so much faster!}
ReplyDeleteHaha you aren't the only one who apparently can't tell the difference between aqua and turquoise, I thought the same thing as you! Oh well, close enough right??? I'm also trying to work my way around night photography, it's definitely not easy work! I think your shoot turned out really successful though!
ReplyDeleteLoved the post. Your results were wonderful!
ReplyDeleteGreat post and pictures it made me laugh:)
ReplyDeleteYou took the challenge literally! They all look gorgeous (as always)! I'm still struggling a bit, but I'll find something.
ReplyDeleteI'm itching to get my computer back up and running. It took my photoshop with it...GAH. I never heard of the tool box before and I'm thinking that it sounds like a good investment.
ReplyDeleteLove the way you took this prompt. Very creative.
Lovely photos! I love the idea. I got a shamrock streamer that I wanted to do St. Patty's day photos with but neither kid wanted to work with me for that lol.
ReplyDeleteBeautiful photos. So....how much did it break you in the bank? LOL. He sure looks pretty happy - like he just won the lotto. :D
ReplyDeletelove the butterfly streamer - that's one to add to my to do list. Now I see why you're in the mood for a lensbaby! Beautiful golden light photos and well worth the journey. I think that I'll join in too as my poor neglected blog hasn't seen a new blog post in 4 months!
ReplyDeleteLove your butterflies!! Great post mama :) xo
ReplyDeleteThank you for sharing your 'humaness'...It makes me feel better about all my no-so-perfect photo shoot attempts! Great post!
ReplyDeleteThey are lovely shots with a nostalgic feel to them. The turquoise was captured so well and highlighted the composition without grabbing attention away from the whole. :-)
ReplyDeleteThanks for the link-up. Your butterflies are gorgeous and so are the photos.
ReplyDeleteLove them! I adore the editing. :)
ReplyDeleteI love butterflies and I love what you did with the prompt. I'm also very impressed that you were able to get your son to model for you - mine would have flat-out refused! :) (Linking up tonight.)
ReplyDeleteMissed this challenge- maybe this week! Great shots!
ReplyDeleteThis made me laugh a little bit because my son never wants to go along with my wacky ideas either - so glad you got your son to do it, and it was so worth as the photos are gorgeous!
ReplyDeleteAwesome shots
ReplyDeleteToday has being the most happiest day of my life after 1 year of
ReplyDeletesadness and sorrow without being with the one i love, i tried all my
possible best to make sure i make my lover happy but it never seems to
work out well it was like am doing everything in vain but all thanks to
Dr EROMOSALE for coming to change all my worries and sadness to Joy. i
knew the great man when i read some wonderful reviews about Dr EROMOSALE
how he has helped a lots of people on there relationship problem i was
reading a magazine which then i saw great testimonies as well which then
i decided not to waste time because i have missed my lover so much i
decided to contact him and share all my problem with him which then he
told me not to worry that he assures me that within 48 hours everything
would be sorted out i believed Dr EROMOSALE so much because i believe he
can't fail me but truly Dr EROMOSALE never failed me a man that stand
on his worlds is really a man,my husband who left me for a year plus
replied my text and for the first time returned my calls and asked me to
please forgive him i was so happy and so grateful to Dr EROMOSALE for
what he has done for me. if you are there passing through this same
problem or of any kinds just contact this great man on
eromosalelovespell@outlook.com or call him on +2348161850195...